There are three key features required to make composting quick and efficient and all the Mantis Compost Tumblers have been developed to ensure these are achieved.
Heat Core
The dimensions of all the Mantis Compost Tumblers have been professionally and accurately calculated for maximum efficiency in building a heat core. By turning the drum of the compost tumbler the materials inside the composter are mixed and the core is stable.
|
 |
Air
All the Mantis Compost Tumblers are designed with air vents on the sides of their drums and doors. These allow air to flow unimpeded during composting.
Moisture
To prevent the waste materials being composted from becoming too soggy the compost tumblers incorporate drainage units on the doors to allow excess moisture to escape.
By incorporating these three key features your Mantis Compost Tumbler is a perfectly balanced, contained rotating bin composter that can turn organic waste into compost in as little as 14 days!!
Mantis Compost Tumblers . . . How They Work
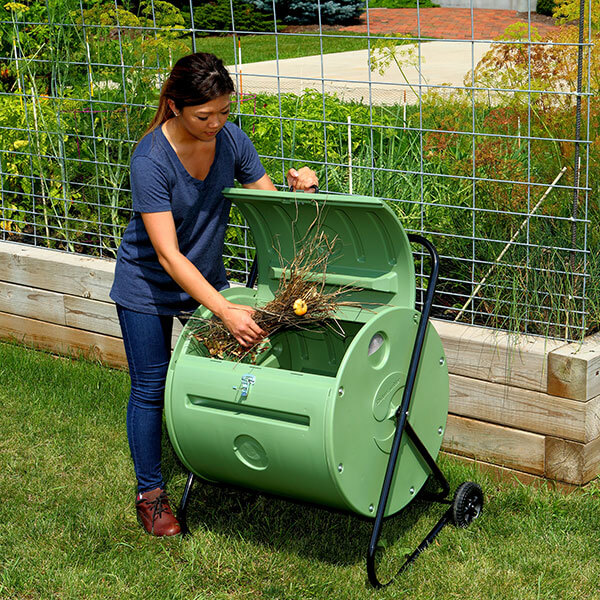
Step 1 Collect Organic Waste
All the compost tumblers have large access doors making it easy for you to add a variety of organic waste materials from your kitchen or garden into the body of the tumbler. Ideally you want to add a mix of materials, in small quantities, trying to keep a balanced mix of ‘greens’ and ‘browns’. Things which can be included are:
‘Greens’
Greens are materials that are rich in nitrogen or protein. They are also the items that tend to ‘heat’ the compost mix as they help the microorganisms to grow and multiply quickly. The following items are classed as ‘greens’ :
Fresh grass clippings, shredded leaves, coffee grounds, tea leaves and tea bags, peels and trimmings from fruit and vegetables, dead flowers or plants, weeds – YES WEEDS CAN BE INCLUDED as the temperature inside the compost tumbler will be hot enough to kill weed seeds! – rooted fruit or vegetables and manure from horses, cows, chickens, rabbits, pigs or sheep (DO NOT INCLUDE waste from dogs or cats).
‘Browns’
Browns are materials that are rich in carbon or carbohydrates. Browns not only help to add bulk and aid air flow, they also form the main food source for the soil-dwelling organisms that will work with the microbes to break down the waste into compost. The following items are classed as ‘browns’ :
Sawdust, straw, black and white sections of newspapers, egg cartons, shredded cardboard, pine needles, brown leaves, twigs and dry or woody plant material.
Once you’ve added material into the compost tumbler simply close the door and immediately give the tumbler five turns.
Step 2 Tumble Your Compost
Ideally turn your compost tumbler five times every day – although this is ideal, it is not absolutely necessary. Composting should be fun and rewarding rather than a chore. If you miss turning the tumbler for a couple of days don’t give up – just start turning the tumbler again when you can – as turning the compost tumbler makes converting waste into compost faster, by missing days will simply slow the process down but it will pick up again when youstart turning it again.
Every time you add new waste into the compost tumbler you should turn the tumbler five times. You should also remember, by adding new waste into the tumbler you are effectively resetting the compost tumbler to day 1 as you need at least 14 days for the waste to turn into compost.
Turning the compost tumbler has been made as easy as possible due to their unique design which incorporates indented grooves on the drum of the mobile compost tumbler, or a gear driven handle on the compact and original tumbler.
Turning the compost tumbler is the key step in the composting process as it eliminates the problems associated with slow decomposition of waste by:
- Redistributing moisture throughout the mix of waste – with a static compost bin the outside of the heap would dry out quickly, reducing decomposition, especially in the warmer, summer days.
- Redistributing the microbe population (and worms, if you have them) so that they reach fresh food supplies where they can digest the organic waste to create compost and reproduce.
- Redistributes the balance of green and brown waste materials so they are evenly mixed to create even decomposition.
- Breaks up clumps of waste so that smaller particles are available to the bugs and worms to digest and turn into compost.
Step 3 Remove Your Organic Compost
On the 14th day from adding fresh organic waste into your compact or original compost tumbler (or 4 weeks or over for the mobile compost tumbler) you should be able to remove rich, usable compost for your garden.
This time is achieved by daily turning the compost tumbler as well as maintaining a good mix of green and brown waste (added in small pieces) together with good weather conditions (during cold, winter months, the composting process is likely to slow down) as the tumbler needs to maintain a good core temperature and a good level of moisture and air reaching the waste in the tumbler.
The compost which you create within your compost tumbler can be used in your garden to create healthier soil and as a result better, stronger, healthier plants. By adding your newly made compost into your garden soil – by digging into the soil or using as top dressing - your soil will benefit in the following ways:
All types of soil will be improved in structure, texture, fertility, drainage and aeration as you add in new compost – this can be seen markedly if you have clay soils as digging compost the soil it will become airier and will have better drainage properties both resulting in a healthier environment for roots of your plants. Whereas, if you have thin, sandy soil adding compost will give the soil more substance and texture to support healthy root growth.
Your plants will grow bigger, produce bigger yields and produce more beautiful flowers by the regular addition of fresh compost into their soil due to it being packed full of natural nutrients.
Adding homemade compost into your soil is not only completely natural and safe it will also result in your plants becoming more resistant to disease. This is because new compost is packed full of minerals which your plants will take up and also contains microorganisms that will compete in order to suppress soil diseases.
Lawns can also benefit from newly made compost – your cam top dress new or existing lawns which will result in thicker, healthier grass. On a newly seeded lawn simply spread a thin layer of compost as a top dressing. For existing lawns, aerate the lawn first and then spread a thin layer of compost on top.
Creating your own compost is also a great way to recycle – adding kitchen or garden waste into your compost tumbler means you’ll be putting less in your bins and less will be going to landfill.