
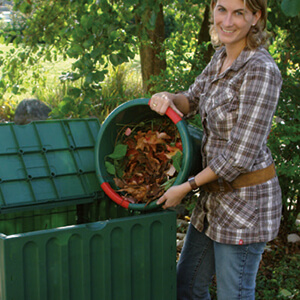
Turning your garden and kitchen waste into nutrient rich compost for your garden is not difficult as long as you follow a few basic steps. Simply read through our top tips for good composting and you should succeed with minimum effort – even if this is the first time you have had a compost bin.
Make It Easy To Reach
Think about how often you will be adding waste into your compost bin and make it simpler for yourself by placing it where you will have easy access. If you need to use a wheelbarrow to transport the waste to your compost bin then there needs to be space to allow you to do that. If you don’t need to add that much waste at once, consider how you will remove and transport the compost when it is ready to use – you might need to use a wheelbarrow then.
Also think about your neighbours when setting up your compost bin – ideally it should be installed at least 2ft away from their property.
Consistent Temperatures Are Good
Ideally you want to avoid extremes of temperature so if you have a spot in your garden or at your allotment where there is semi shade, such as under trees or by a hedge for example, then this will be the best place for your new compost bin. By providing a consistent temperature the micro-organisms which help to convert your garden and kitchen waste into compost (such as bacteria and fungi) will work effectively. Your compost bin needs some sun to help evaporate some of the water from its contents but should not be in constant sun as you don’t want the contents to dry out completely. See our tip later which explains about the ideal moisture content of your compost bin.
Compost Bins Need Good Drainage
The ideal moisture level for compost is between 40-60% - the compost should feel like a sponge which has had most of the water squeezed out if it. When the water content is higher than 60% your compost bin will start to stink – this is because the water will be displacing the air in your compost creating anaerobic conditions which will smell like rotten eggs or ammonia.
However, if the moisture level falls below 40% then the composting process will start to slow down – as the materials dry out most of the creatures carrying out the composting process will either go dormant or die.
With this information in mind, when siting your new compost bin ideally sit it directly onto soil as this will allow excess water to naturally drain away rather than being trapped within your compost bin. Loosen compressed ground before installing the bin. DO NOT site your compost bin on concrete, stone or asphalt surfaces.
Adding Water To Your Compost Bin
The information above shows you how essential it is to have the correct level of moisture in your compost bin for the composting process to effectively take place. If you are unsure if there is sufficient moisture then put on a pair of gloves and pick up a handful of the ‘compost’ – ideally do this after you have just turned your compost so you’re getting an equal mix of new and mature compost. Squeeze your handful of compost – if water gushes out then it’s too wet. If you can’t squeeze out any water then it’s too dry.
So, if it’s too dry and, as you have just turned the pile of the compost in the bin, now is the perfect time to add some water – you could turn the compost again after adding water to ensure all areas of the pile are damp.
If you find your compost is extremely dry you may need to remove the top few layers, add water to the bottom half and then add the top layers back, adding more water after each layer. If you find that your compost bin often operates on the dry side, then consider adding some water every time you add new waste into the bin – especially if you are adding in dry waste. Just be careful that you don’t add too much water! Whether your compost bin has been too dry or too wet, it will take a few days for your compost pile to settle down again and the composting process to start again.
Encourage Soil Organisms
One of the other reasons for siting your compost bin onto soil it that this is the best way to enable soil organisms, such as worms and ants, to reach your compost pile and do their work!
Its important that worms take up residence in your compost bin as they will perform two important functions.
|
|
Firstly, as the worms tunnel their way through the waste in your compost bin they will loosen the material which helps any trapped water drain from the compost bin and helps to open pockets of oxygen for the microorganisms to work effectively. Secondly, the worms eat the organic waste which you’ve added into your compost bin and excrete castings, which are an organic form of fertiliser. |

Encouraging ants into your compost bin is also a good thing, despite what many people might think. Ants bring fungi into the compost bin that helps with the composting process and can make the compost rich in phosphorus and potassium. As you turn the compost regularly you’ll break up any ant colonies (which you want to prevent).
Have a Balanced Diet
|
Just like us, your compost bin works best when given a balanced diet. When it comes to a balanced diet of garden and kitchen waste, it’s the case of getting a balanced mix of ‘greens’ and ‘browns’. You should aim for between 25-50% green materials and the rest should be brown materials. |
 |
Here’s a long list of garden / kitchen waste divided between ‘greens’ and ‘browns’, it’s not exhaustive but it will give you guidance on the majority of items you are likely to be adding to your compost bin :
Greens
|
Browns
|
Ideally lay down alternating layers of greens and browns. Using a wide variety of ingredients in your compost will work best, creating a richer compost. When adding waste into your compost bin for the first time add a bulky, structured material first – such as broken twigs. This will make it easier for ait to enter the compost from below and make it easier for excess water to drain away.
Some Things Should Be Avoided
Although there are loads of things which you can add to a compost bin and they will go through the composting process and result in nutrient rich compost, there are also things which you should never add to a standard compost bin (although you might find some very specialist compost bins or wormeries which can cope with some of these items – but it will specifically mention normally non compostable items if this is the case).
|
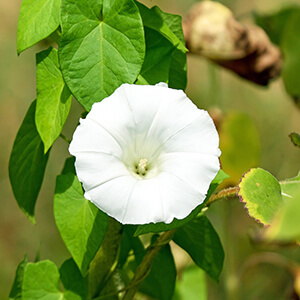
Bindweed might look pretty with its pure white trumpet flowers but it is a weed and will choke your border plants. Bindweed is one of those things you should not add to your compost bin as a general compost bin will not get hot enough to kill this weed - so the best way to dispose of it is to rot it down in a bucket of water. Once rotted down you can add that water to your compost bin. |
 |
Here is a selection of the main things to avoid :
- No fish, meat or dairy products (these will rot, smell unpleasant and attract rodents)
- No diseased plants
- No dog poo (although we do have specialist wormeries which will cope with this)
- No cat litter
- No babies’ nappies
- No perennial weeds (such as dandelions, thistle)
- No weeds with seed heads
- No plastic, glass or metal
- No bread
- No coal ash
- No clothing – even if torn or shredded
- No citrus peels
- No onions
- No cooking oil
- No sales receipts or thermal paper
- No vacuum cleaner dust or dryer lint (in the past you might have found this listed but it is now known to include too many synthetic fibres which will not break down)
- No treated or painted wood
Keep It Small
With such a wide range of items which you can add to your compost bin, there is the potential for a large selection of different sized parts arriving in your compost bin all at the same time. Common sense tells us that if an item is smaller it will compost faster than larger sized item, so where possible we recommend that you shred or chop up your waste before you add it to your compost bin.
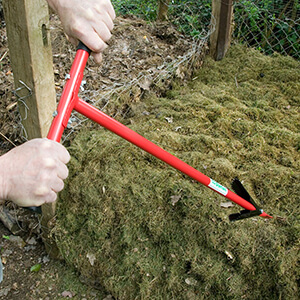
Turn The Contents To Add Air
It is important that your compost bin is aerated as the micro-organisms that work to turn the waste into usable compost need oxygen to function. The easiest way to ensure aeration is to turn the compost – if you don’t do this then these micro-organisms won’t get the oxygen that they need to survive and will eventually die off, which will slow down the rate of decomposition in your compost bin.
Ideally you should turn the contents of your compost bin every 3-7 days – depending on how mature the compost is affects the frequency of turning. The less mature the compost the more frequently it should be turned, the more mature it is the less often it needs turning.
|
You could use a garden fork or spade to turn the contents of your compost bin or use a specially designed tool such as our Compost Aerator. This sturdy tool has a specially shaped head to turn the compost effectively, even in small spaces, making it easier to use than standard garden fork or spade. |
 |
Boost The Composting Process
You can speed up the composting process by using a specially developed powder such as the Compost Accelerator. Packed full of the correct enzymes needed for the composting process adding this into your compost bin can half the composting time! It is quick and easy to add – the accelerator powder can be added to water and then added into your compost bin. Or it can be mixed with sand or dry soil and added into your pile of compost each time you add new waste.
If you follow all our tips then you just need to be patient and your kitchen and garden waste will be transformed into a nutrient rich compost. Generally this can take anywhere from 6 months to 2 years – you’ll know when the compost has reached maturity as it will be a dark brown colour, with a soil-like texture.
Use this rich compost as a soil improver in your garden – research has shown that unlike simply adding mineral fertilisers to your garden soil, compost made in your compost bin will retain and improve soil fertility. You’ll also save money by not having to buy fertilisers to add to your garden soil.
The other positive result of having a compost bin is that you can reduce your household waste by up to 30% - so you will be actively protecting the environment.